

Since the mid-1980’s, Kay Wiemer Gerke has been baking gourmet breads in Montrose, Colorado, using the skills she cultivated in forming pots to create beautiful loaves of bread. Over more than 23 years, she became regionally renowned for her original recipes and techniques in baking. Now retired from full-time bread baking, and shifting focus to pottery exclusively, she has published many of her recipes here that can be made and used with the collection of ceramics from Bent Mountain Pottery. New recipes will be added often.
Bent Mountain’s pots are quite versatile and have multiple uses. Bread can be baked in baking dishes, pie plates, bread bakers and even bowls. All pieces are oven, microwave, and dishwasher safe, so all items can be used for baking. You will find recipes for many different baked goods that can be creatively baked in all kinds of pottery pieces.
Additional photos of the foods in the recipes will be shown on the BLOG.

QUICK AND EASY SOURDOUGH BREAD IN THE BREAD BAKER
QUICK AND EASY SOURDOUGH BREAD IN THE BREAD BAKER
*Makes 2 BREAD BAKER LOAVES, or bake the 2nd one in an 8”x4” pan*
Kay Gerke. - bentmountainpottery.com
1 c. Sourdough starter
3 1/4 c. Warm water
3 1/2 c. Flour
Combine starter, water and flour in a large bowl or Kitchen-Aid type mixer. Mix well. Let stand, covered, in a warm place overnight.
1 T. Yeast
2 T. Apple cider vinegar
3 T oil or melted butter
3 T. Sugar
1 T. Salt
5 1/2 c. Flour
1 tsp. Baking soda - sifted (very important!)
The next morning (or 8-12 hours later), sprinkle yeast on top of starter mixture and stir well. Add apple cider vinegar, oil or melted butter, sugar, and salt. Stir well.
Mix sifted baking soda with 2 c. Flour and mix by hand or mixer until batter is smooth. Cover and let sit in a warm place for 1 hour, or until doubled in size.
Mix dough again and gradually beat in the remaining flour until dough is stiff enough to pull away from the sides. If using a mixer, beat on medium speed for 5-7 minutes, adding a little four if necessary. If mixing by hand, turn it out on a counter top and knead well for 5-7 minutes, until smooth and elastic, adding a little flour if needed.
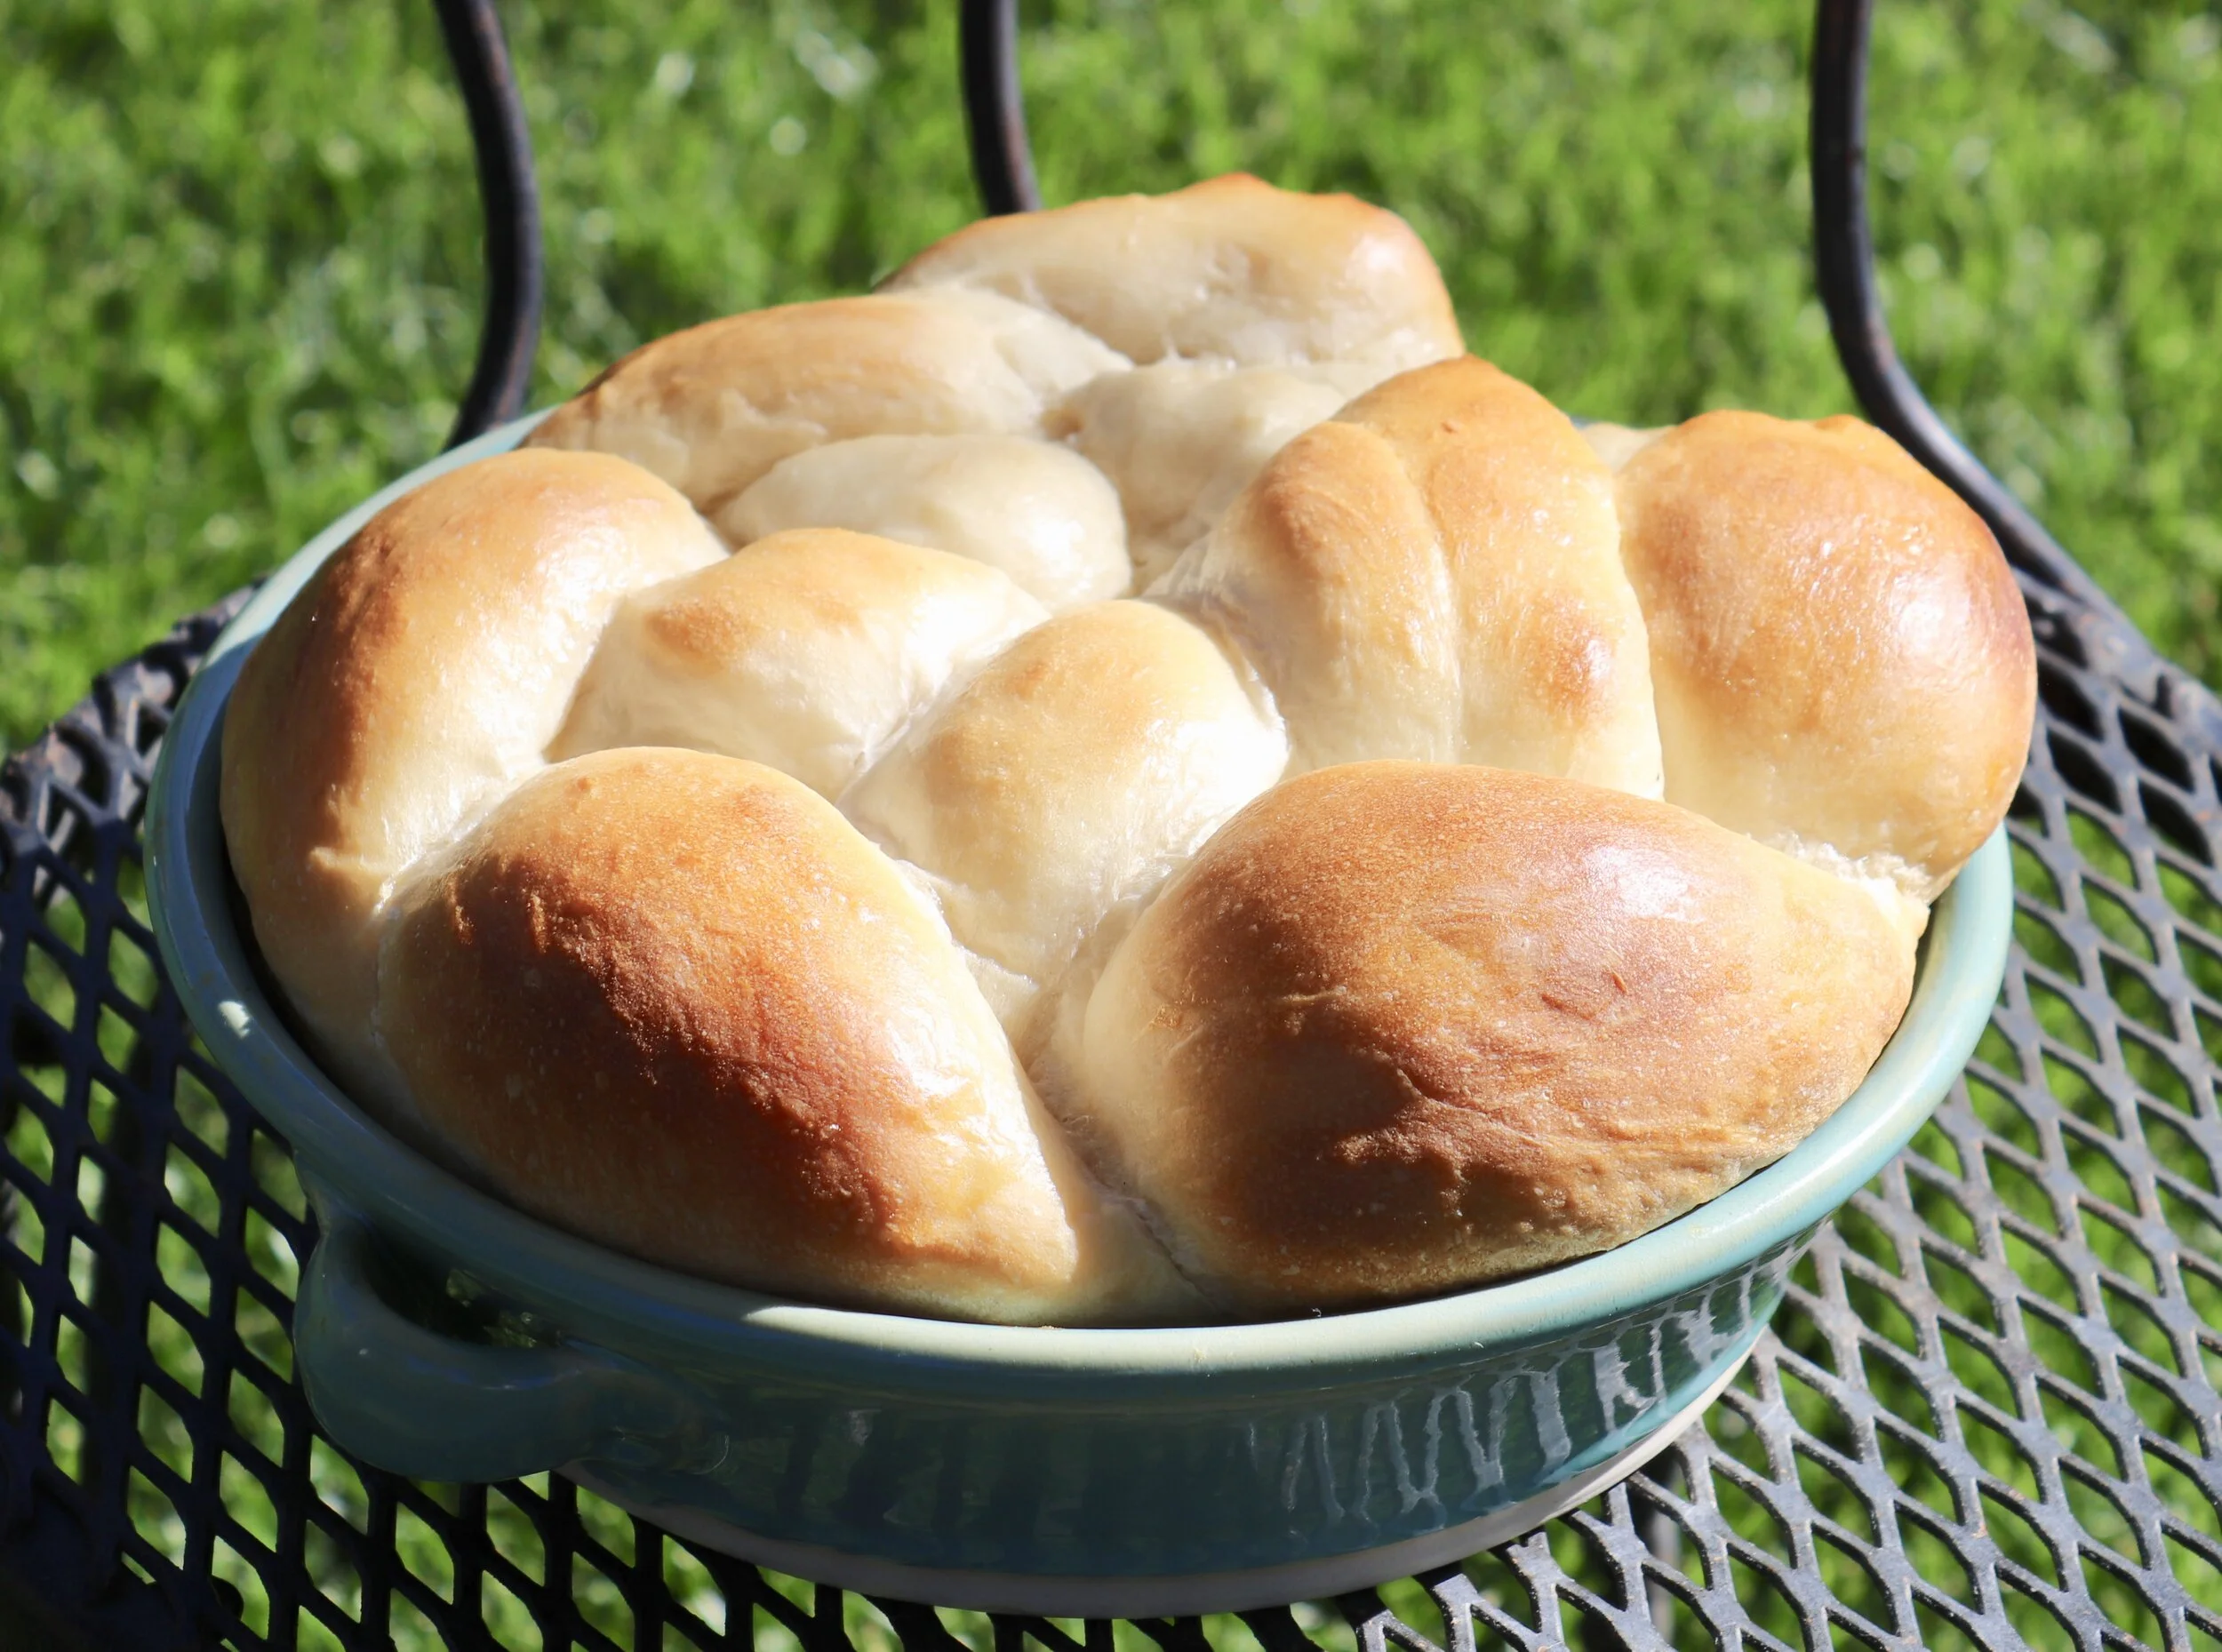
Let dough rest, covered, for 10 minutes. Grease or spray a BREAD BAKER and an 8”x4” non-stick bread pan, unless you have 2 of each. Divide dough in half. Shape loaves and place them in the prepared baking pans.
Cover with clean dish towels. In a warm place, let rise until doubled and about an inch above the sides of the pan/baker. Preheat oven to 450F. Bake loaves at 450 F for 15 minutes, reduce heat to 350 F, and bake for 15-30 additional minutes, depending on your oven.. Watch it closely and let it bake until evenly golden brown all over.
SUPER SIMPLE, YEAST BASED SOURDOUGH STARTER
2 cups all-purpose flour
1 tsp. Salt
3 T. Sugar
1 T. Instant yeast
2 c. Warm water
With a wooden spoon, stir dry ingredients together in a large mixing bowl and add water. Stir until smooth and resembles a smooth paste. Cover with a towel or a dinner plate and set in a warm place to sour. Stir mixture several times a day for 3-4 days. It will bubble up and then fall several times. After 4 days, it will smell pleasantly sweet and sour. Store in the refrigerator, in a large jar with a slightly loose lid, or in a sourdough crock. If over time and use the starter seems to not be as active or bubbly, add 1 tsp. Instant yeast to it, stir it down, and let it sit on the counter for a day before storing it again.
HOW TO REPLENISH YOUR STARTER AFTER EACH USE
After you pour off the amount of starter called for in your recipe, put the remaining starter in a large bowl and add equal parts water and flour, for the amount of starter you took out. Stir well, cover, and let rest in a warm place for 24 hours to renew, stirring a few times. Place back into your crock or jar and store again in the fridge.
EXAMPLE: If your recipe calls for 1 c. starter, pour out that 1 c. of starter for your recipe and replenish it with 1 c. water and 1 c. flour.
***There are many, many different kinds of sourdough starters using different grain flours, no instant yeast, adding grated raw potatoes or other vegetables or fruit, yogurt, etc. I chose this one because of how easy and successful it is. Explore many more on your own. It’s so fun!

FRESH SPINACH BREAD
3 packed cups of fresh spinach
2/3 c. Warm water
Puree in a blender. Add spinach a little at a time, carefully pushing it down with a wooden spoon.
1 2/3 c. Warm water
2 tsp.salt
2 T. Oil
2/3 c. Sugar or honey
2 1/4 tsp. Yeast (1 pkg.)
BOWL: Mix well, let rest 5 min., or till yeast dissolves well.
MIXER: Mix well, let rest 5 min., or till yeast dissolves well.
BREAD MACHINE: Add to pan in order, stir with a wooden spoon or spatula.
ADD TO EACH:
4 1/2 c. unbleached or all-purpose flour (This can also be a wheat bread by adding 1/2 white + 1/2 wheat flour.)
BOWL: Add flour, 1 c. at a time and knead until smooth and elastic (5-10 min.,
depending on your skill level)
MIXER: Add 2 c. flour and mix on high for 3-4 min. Add remaining flour and turn mixer to medium for
7 min.
BREAD MACHINE: Add all flour, and set
the bread machine for either a medium loaf and color for baking it in the bread machine, or
just set it for the dough setting, to then be placed in regular baking pans, or a pottery bread
baker, for baking in a regular oven.
RISING INSTRUCTIONS:
BOWL: Place completed dough back in the mixing bowl, cover, and leave in a warm place until
doubled in bulk. Shape loaves and place them in either greased, dark, preferably non -
stick, medium-size (8 1/2” x 4 1/2”) bread pans or a greased pottery bread baker. Cover, let
rise in a warm place until the dough is almost your desired end height. Do not bake until it is
rounded and about 1 1/2 - 2 inches above the sides of the pan. Do not it let it rise too high
and begin to flatten, because that will result in a fallen loaf with an airy hole in the middle.
MIXER: Using a Kitchen-Aid or Bosch mixer mixes the dough so thoroughly that the dough will not
require 2 rising steps. As soon as the dough is smooth and elastic, Shape loaves and place
them in either greased, dark, preferably non -stick, medium-size (8 1/2” x 4 1/2”) bread pans
or a greased pottery bread baker. Cover, let rise in a warm place until the dough is almost
your desired end height. Do not bake until it is rounded and about 1 1/2 - 2 inches above the
sides of the pan. Do not let rise too high and begin to flatten, because that will result in a
fallen loaf with an airy hole in the middle.
BREAD MACHINE: Remove dough from bread pan when the dough cycle/rising is completed.
Shape loaves and place them in either greased, dark, preferably non -
stick, medium-size (8 1/2” x 4 1/2”) bread pans or a greased pottery bread baker. Cover, let
rise in a warm place until the dough is almost your desired end height. Do not bake until it is
rounded and about 1 1/2 - 2 inches above the sides of the pan. Do not let it rise too high and
begin to flatten, because that will result in a fallen loaf with an airy hole in the middle.
BAKING
Bake at 350º for 20-30 minutes, depending on your oven. Turn the pans 180º after 10 minutes. Check for doneness after 20 minutes by holding a pot holder in one hand, and with a potholder in the other hand holding the pan, plop the loaf out onto the free hand to check to see if it is evenly golden brown. If it still looks a bit pale, rotate the pan and continue to bake, checking it every 5 minutes until it is done.
A FEW BREAD BAKING TIPS:
1. If the dough seems too sticky, add additional flour, a little at a time, until it is smooth and elastic, but not too stiff. This includes using a bread machine method. Check the ball of dough several times while it’s mixing. Add flour if it is too sticky, and add a little water if it seems too stiff.
2. One sure way to check for doneness of baked bread when you think it looks finished is to slice right down the center of the loaf, almost to the bottom crust, to see if it is still doughy in the center. If is is, fold it back to together, put it back in the pan, and then bake for another 5 min., or until it’s done. When it is finished, slice those doughy center edges off and the rest of the loaf will be just fine. You won’t have to do this more than once or twice, or until you learn to judge for yourself.
3. I always use an electric knife to slice my bread. By doing this, the slices will be as thin or thick as you want and there will not be a lot of crumbs. Once you try this, you will love it.
4. DO NO USE LARGE, 9 1/2” X 5 1/2” loaf pans!!!! They are too large and most bread recipes will not fill them, making the loaves flat and small. The medium size are the best! Ideally, 8 1/2” x 4 1/2” dark, non-stick bread pans are the best!
BAKER’S SECRET is a good, inexpensive brand that can be found at Kroger affiliated stores or WINCO. Walmart tends to carry only the bigger ones or small mini-loaf pans.

BANANA BREAD
Kay Gerke. - bentmountainpottery.com
Ingredients
1 Stick (1/2 Cup) Butter
3 Large Ripe Bananas
2 Large Eggs
1 teaspoon Vanilla Extract
2 Cups All Purpose Flour
1 Cup Granulated Sugar
1 teaspoon Baking Soda
1/2 teaspoon salt
1/2 teaspoon cinnamon
Instructions
1. Preheat oven to 350 degrees. Spray BREAD BAKER with non-stick cooking spray or grease with butter and set aside.
2. Add the stick of butter to a large bowl and microwave for 1 minute, or until melted.
3. Add the bananas to the same bowl and mash with a fork.
4. Add the vanilla extract and egg to the bowl and use the same fork to mash and stir until no yellow streaks of egg remain.
5. In a second large bowl whisk together the flour, sugar, baking soda, salt, and cinnamon.
6. Add the dry ingredients to the wet ingredients and mix together with a spatula just until combined.
7. Pour the batter into prepared loaf pan and bake for 45-55 minutes until a toothpick inserted in the center of the bread comes out clean.

QUINOA WHOLE WHEAT BREAD
Kay Gerke - bentmountainpottery.com
COMBINE IN A BOWL, KITCHEN-AID TYPE MIXER, OR BREAD MACHINE PAN:
2 c. warm water
1 T. or pkg. instant dry yeast
1 c. Cooked quinoa
2 T. oil
2 tsp. salt
2/3 c. sugar or honey (less if you prefer)
1 T. instant dry yeast
BY HAND: Mix well, let rest 5 min., or till yeast dissolves well.
MIXER: Mix well, let rest 5 min., or till yeast dissolves well
BREAD MACHINE: Add to pan in order, stir with a wooden spoon or spatula.
ADD TO EACH:
2 c. whole wheat flour
2 1/2 c. unbleached or all-purpose flour
2 T. Vital gluten powder (Optional). It really improves the texture and adds protein, if you have some.
BY HAND: Add flours mixed with gluten, 1 c. at a time and knead until smooth and elastic (5-10 min.,
depending on your skill level)
MIXER: Add 2 c. Whole wheat flour, plus the gluten, and mix on high for 3-4 min. Add remaining
flour and turn mixer to medium for 7 min.
BREAD MACHINE: Add all flour, with gluten mixed into the flour before it goes in the pan, and set
the bread machine for either a medium loaf and color for baking it in the bread machine, or
just set it for the dough setting, to then be placed in regular baking pans, or a pottery bread
baker, for baking in a regular oven.
RISING INSTRUCTIONS:
BY HAND: Place completed dough back in the mixing bowl, cover, and leave in a warm place until
doubled in bulk. Shape loaves and place them in either greased, dark, preferably non -
stick, medium-size (8 1/2” x 4 1/2”) bread pans or a greased pottery BREAD BAKER. Cover, let
rise in a warm
place until the dough is almost your desired end height. Do not bake until it is rounded and
about 1 1/2 - 2 inches above the sides of the pan. Do not it let rise too high and begin to
flatten, because that will result in a fallen loaf with an airy hole in the middle.
MIXER: Using a Kitchen-Aid or Bosch mixer mixes the dough so thoroughly that the dough will not
require 2 rising steps. As soon as the dough is smooth and elastic, Shape loaves and place
them in either greased, dark, preferably non -stick, medium-size (8 1/2” x 4 1/2”) bread pans
or a greased
pottery bread baker. Cover, let rise in a warm place until the dough is almost your desired
end height. Do not bake until it is rounded and about 1 1/2 - 2 inches above the sides of the
pan. Do not let rise too high and begin to flatten, because that will result in a fallen loaf with
an airy hole in the middle.
BREAD MACHINE: Remove dough from bread pan when the dough cycle/rising is completed.
Shape loaves and place them in either greased, dark, preferably non -
stick, medium-size (8 1/2” x 4 1/2”) bread pans or a greased pottery bread baker. Cover, let
rise in a warm place until the dough is almost your desired end height. Do not bake until it is
rounded and about 1 1/2 - 2 inches above the sides of the pan. Do not it let rise too high and
begin to flatten, because that will result in a fallen loaf with an airy hole in the middle.
BAKING
Bake at 350º for 20-30 minutes, depending on your oven. Turn the pans 180º after 10 minutes. Check for doneness after 20 minutes by holding a pot holder in one hand, and with a potholder in the other hand holding the pan, plop the loaf out onto the free hand to check to see if it is evenly golden brown. If it still looks a bit pale, rotate the pan and continue to bake, checking it every 5 minutes until it is done.
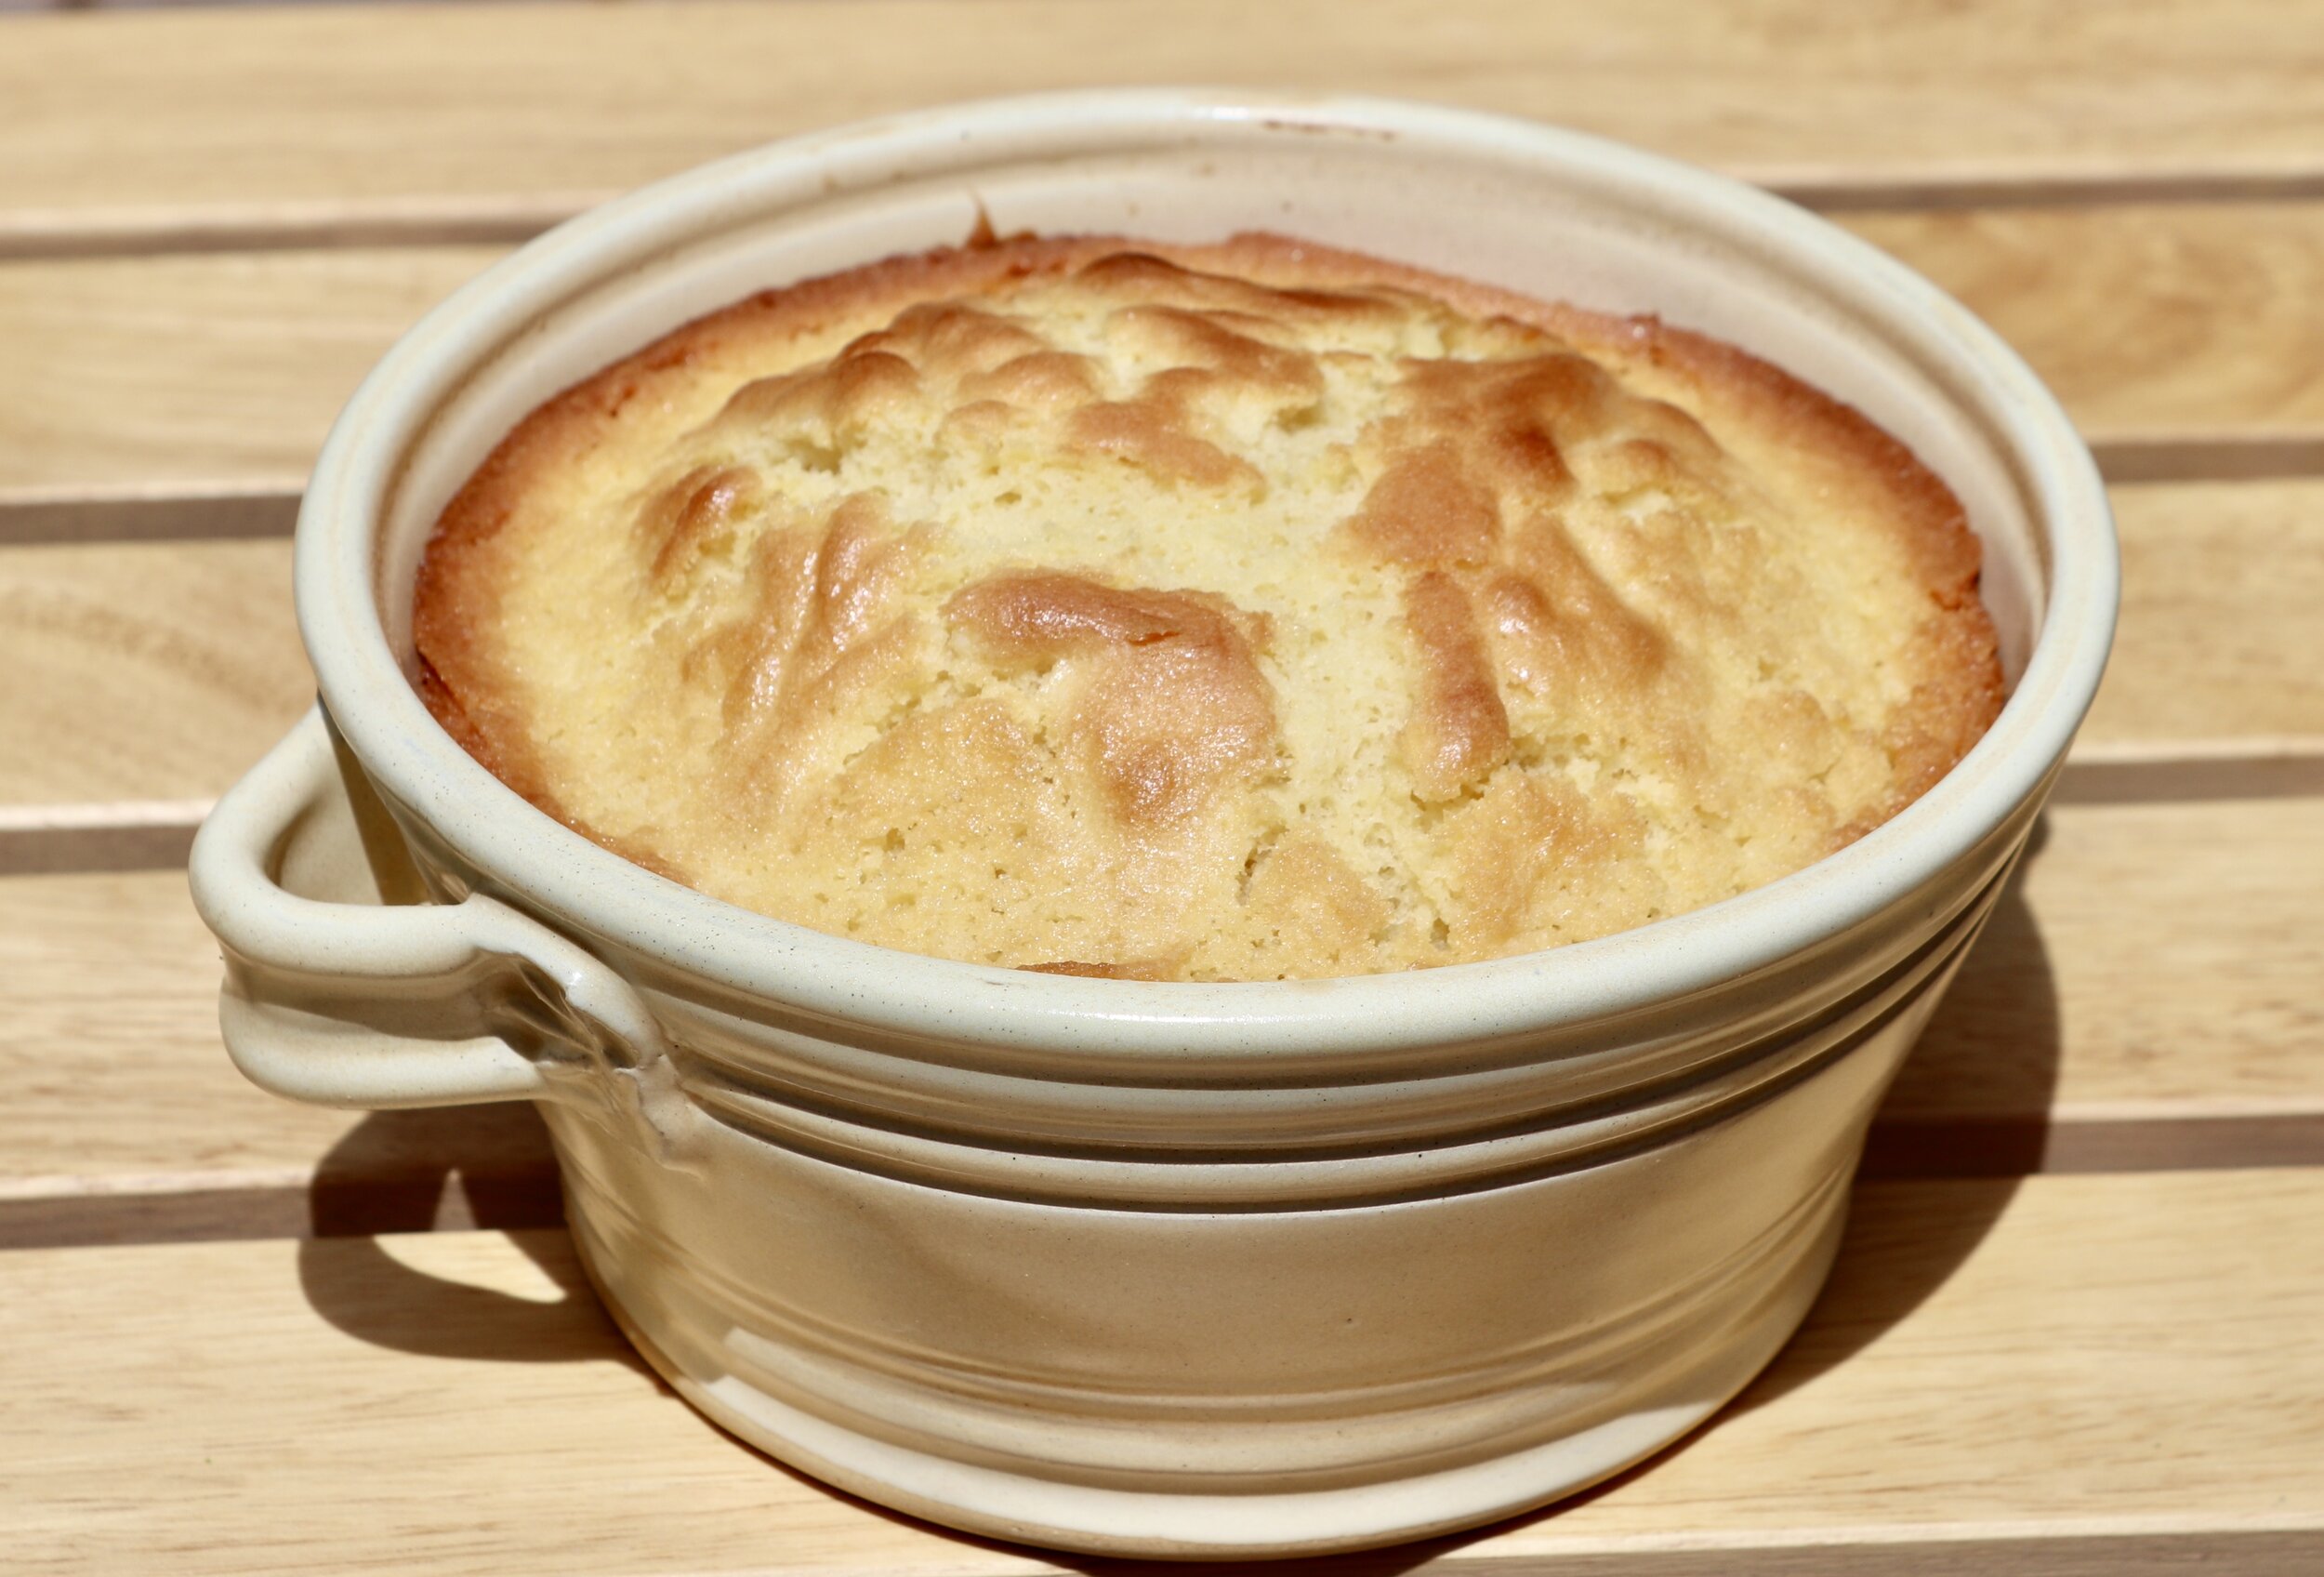
ALMOND POUND CAKE
Kay Gerke. - bentmountainpottery.com
1/4 c. milk
3 large eggs
2 teaspoons vanilla extract
1 teaspoon almond Extract
1-1/3 cups cake flour, spooned into measuring cup and leveled with a straight edge
3/4 cup sugar
3/4 teaspoon baking powder
1/4 teaspoon salt
13 tablespoons butter, softened
INSTRUCTIONS
Preheat the oven to 350°F and set an oven rack in the middle position. Grease or spray a pottery bread baker with a non-stick cooking spray. In a medium bowl, whisk together the milk, eggs, almond and vanilla until just combined.
In the bowl of an electric mixer fitted with the paddle attachment (or with a hand mixer), place the flour, sugar, baking powder, and salt. Mix on low speed for about 30 seconds or until blended. Add the softened butter and half of the egg mixture. Mix on low speed until the dry ingredients are moistened. Increase the mixer speed to medium (high speed if using a hand mixer) and beat for one minute. Scrape down the sides of the bowl. Add the remaining egg mixture, in 2 separate additions, beating about 30 seconds after each addition to combine. Do not over-mix. (The batter may have a slightly curdled or grainy appearance -- that's okay.)
Scrape the batter into the well-greased and floured, or sprayed with cooking spray, BREAD BAKER and smooth the top with a spatula or the back of a spoon. Bake for 50 to 55 minutes, or until the cake is golden brown and a toothpick inserted into the center of the cake comes out clean.
Place the cake on a wire rack and cool for about 10 minutes. Then remove the cake from the BREAD BAKER and cool completely on a wire rack. Wrap the cooled cake in plastic wrap or store in a large sealable plastic bag.
The wrapped pound cake will keep for several days at room temperature, for one week when refrigerated. Freezes well.

English Muffin Bread
2 3/4 c. Warm water
1/2-3/4 c. Sugar (sweetness preference)
1 T. Yeast
2 3/4 c. Unbleached flour
2 1/2 tsp. Salt
3/4 c. Cornmeal
3 T. Oil of choice
Combine ingredients in a bowl. Mix well. Let stand, covered, in a warm place 5 min. or until it becomes light and bubbly. Add ADDITIONAL 3-4 C.UNBLEACHED FLOUR, a little at a time, mixing well with a wooden spoon. When dough becomes too stiff to stir, pour out onto a floured surface. Knead 5-10 minutes, adding flour as needed to form a smooth, moderately stiff dough. (You may not use all the flour.)
Return to bowl, cover, put in a warm place and let rise until doubled in bulk (30-40 min.). Punch down, form 2 loaves. Place in 2 medium size (8” x 4”) well-greased pans, or pottery baking dishes of your choice. If desired, cut shallow, diagonal knife cuts on top of loaves before they rise. Cover with clean dish towel and keep it in a warm place, let rise until almost desired completion height (20-30 min.).
Bake at 350F. until evenly browned, about 25-35 min. Length of baking times depend upon ovens, altitude, and pans. Pottery baking dishes sometimes require additional time to lightly brown the bottoms of the loaves. If tops are browning too quickly, be sure to cover tops of loaves with foil to even out the baking time for consistent browning.

PEAR SWEET BREAD
1 recipe of POTATO BREAD (This recipe is already on my website)
FILLING:
4 c. Sliced pears (I leave the peels on for nutritional value and color)
1 c. Sugar
1 tsp vanilla (opt.)
1/3 c. Flour
1 tsp. Cinnamon
Mix together until all dry ingredients are moist.
Roll out dough onto a lightly floured surface, in a large rectangle about 14’ x 10”. Spread 1/2 c. softened butter onto the dough. Spread pear filling evenly over the rectangle. Carefully roll up like cinnamon rolls. Either place rolled dough onto a large, rectangular baking pan or a round, shallow pottery baking dish. Use scissors or a sharp serrated knife and make horizontal cuts along the top of the loaf. Let rise until doubled and light. Bake 35-45 minutes at 350 F., or until evenly golden brown. Check the bottom of the loaf to be sure it is lightly browned. If the top browns more quickly than when the bottom is ready, cover the top with foil to slow over-browning the top.

FRESH PEACH PIE w/ FLAKY BUTTER CRUST
CRUST RECIPE
2 ½ cups (315 grams) flour
1 tbsp sugar
1 tsp table salt
2 sticks (8 ounces or 1 cup) unsalted butter, cut into chunks and kept very cold before using
½ – ¾ cup very cold water
INSTRUCTIONS
Measure the flour into a large, wide bowl. Whisk in the sugar and salt. Toss in the butter cubes and coat them all with the flour. Using your first 3 fingers of both hands, mash up the butter into smaller pieces, just bigger than the size of peas. You can also do this with two knives or a strong pastry blender. I prefer using my fingers.
Once the mixture looks sort of uniform, slightly crumbly, and the butter is broken up, stir in a ½ cup of ice water with a rubber spatula until the water is absorbed and the dough starts to come together. If the dough is still dry and crumbly, add the remaining ¼ cup of ice water. Bring the dough together with your hands until it forms a soft and almost loose ball.
Divide the pie dough in half and transfer one half to a sheet of plastic wrap and mold it into disk, about 1-inch thick. Use the plastic wrap to help bring the dough together, if needed. Repeat with the remaining dough.
Chill the dough disks in the refrigerator for at least 2 hours before using. You can keep this dough in the fridge for up to a week or up to 2 months in the freezer before using.
Roll the dough directly from the refrigerator (do not allow it to come to room temperature – remember you need to keep the butter really cold) or if frozen, allow the dough to rest in the fridge for one day before rolling.
Bake 40-50 minutes at 400 F. Baking times will depend on oven, so keep a close eye on it. I recommend using an edge protector to prevent the rim from burning before the center is done.
FRESH PEACH FILLING
4 c. sliced peaches ( apples or pears can be substituted for peaches)
1 c. sugar
1 tsp. cinnamon
1/3 c. flour
Mix together in a mixing bowl. Gently stir until all dry ingredients are moist.
Pour into bottom pie crust, smooth. Cover with top crust dough. Trim to about 1” around rim. Tuck that 1” dough under the bottom crust dough. This helps to seal the filling inside the crust. Pinch a decorative edge and cut out a peach and leaves from left-over scrap dough. Bake according to instructions above.

OATMEAL / SUNFLOWER WHEAT BREAD
2 3/4 c. Warm water 1/2-3/4 c. Sugar (sweetness preference)
1 T. Yeast 2 3/4 c. Whole wheat flour (**plus 2 T. Gluten powder, opt.)
1 T. Salt 1/2 c. Sunflower seeds
3 T. Oil of choice 1/2 c. Wheat or oat bran (opt.)
1/2-3/4 c. Sugar (sweetness preference) 1 c. Cooked oatmeal (an instant oatmeal packet, cooked, works fine)
Combine ingredients in a bowl. Mix well. Let stand, covered, in a warm place 5 min. or until it becomes light and bubbly. Add ADDITIONAL 3-4 C. UNBLEACHED FLOUR, a little at a time, mixing well with a wooden spoon. When dough becomes too stiff to stir, pour out onto a floured surface. Knead 5-10 minutes, adding flour as needed to form a smooth, moderately stiff dough. (You may not use all the flour.)
**GLUTEN POWDER INFO.** Adding gluten powder is not essential, but it will greatly improve the texture of the bread.
Return to bowl, cover, put in a warm place and let rise until doubled in bulk (30-40 min.). Punch down, form 2 loaves. Place in 2 medium size (8” x 4”) well-greased pans, or pottery baking dishes of your choice. If desired, cut shallow, diagonal knife cuts on top of loaves before they rise. Cover with clean dish towel and keeping a warm place and let rise until almost desired completion height (20-30 min.).
Bake at 350F. until evenly browned, about 25-35 min. Length of baking times depend upon ovens, altitude, and pans. Pottery baking dishes sometimes require additional time to lightly brown the bottoms of the loaves. If tops are browning too quickly, be sure to cover tops of loaves with foil to even out the baking time for consistent browning.

FRUIT COBBLER - EASY, EASY!
Preheat oven to 400 F
1 c. Flour
1 c. Sugar
1 c. Milk
1/2 tsp. Salt
1 tsp. Baking powder
1 cube butter (1/2 c.)
4 c. Fruit (if canned, drain)
To make your own filling:
4 c. Fresh or frozen peaches (sliced), apples, blueberries, strawberries, blackberries, raspberries, etc.,
Mixed with 1 c. Sugar
(1 tsp. Cinnamon, optional for peaches or apples)
Mix all ingredients, except fruit and butter. Melt butter in a 9” x 9” baking dish or round ceramic dish, in a 400 F oven.
Pour in batter. DO NOT STIR! Place fruit on top.
Bake at 400 F for 15 minutes. Lower heat to 350 F and bake for 30 minutes, or until golden brown.

PASTA SALAD
6 SERVINGS
1 pound pasta of your choice
(16 ounce) bottle Italian-style salad dressing
2 cups cherry tomatoes, diced
1 green bell pepper, chopped
1 red bell pepper, diced
1/2 yellow bell pepper, chopped
1 (2.25 ounce) can black olives, chopped
1/4# hard salami or pastrami, cut into pieces
Add all ingredients to list.
In a large pot of salted boiling water, cook pasta until al dente, rinse under cold water and drain.
In a salad bowl, combine the pasta, cherry tomatoes, bell peppers and olives.
Pour dressing over salad; toss and refrigerate overnight.
POTATO BREAD
2 3/4 c. Warm water 1 c. Cooked, mashed potatoes ( 3/4 c. Dry potato flakes = 1/4 c. Extra water)1
1 T. Yeast 1/2-3/4 c. Sugar (sweetness preference)
1 T. Salt 2 3/4 c. Unbleached flour
3 T. Oil of choice
Combine ingredients in a bowl. Mix well. Let stand, covered, in a warm place 5 min. or until it becomes light and bubbly. Add ADDITIONAL 3-4 C. FLOUR, a little at a time, mixing well with a wooden spoon. When dough becomes too stiff to stir, pour out onto a floured surface. Knead 5-10 minutes, adding flour as needed to form a smooth, moderately stiff dough. (You may not use all the flour.)
Return to bowl, cover, put in a warm place and let rise until doubled in bulk (30-40 min.). Punch down, form 2 loaves. Place in 2 medium size (8” x 4”) well-greased pans, or pottery baking dishes of your choice. If desired, cut shallow, diagonal knife cuts on top of loaves before they rise. Cover with clean dish towel and keeping a warm place and let rise until almost desired completion height (20-30 min.).
Bake at 350F. until evenly browned, about 25-35 min. Length of baking times depend upon ovens, altitude, and pans. Pottery baking dishes sometimes require additional time to lightly brown the bottoms of the loaves. If tops are browning too quickly, be sure to cover tops of loaves with foil to even out the baking time for consistent browning.

WHEAT BERRY-SUNFLOWER-PUMPKIN SEED BREAD
COMBINE IN A BOWL, KITCHEN-AID TYPE MIXER, OR BREAD MACHINE PAN:
***MAKES 2 LOAVES***
2 c. warm water
1 T. or pkg. instant dry yeast
1 c. wheat berries (boiled wheat, drained)
2/3 c. raw shelled pumpkin seeds
2/3 c. raw sunflower seeds
2 T. oil
1/2 c. wheat germ or bran (optional)
2 tsp. salt
2/3 c. sugar or honey (less if you prefer)
BOWL: Mix well, let rest 5 min., or till yeast dissolves well.
MIXER: Mix well, let rest 5 min., or till yeast dissolves well
BREAD MACHINE: Add to pan in order, stir with a wooden spoon or spatula.
**ADD TO EACH:
2 c. whole wheat flour
2 1/2 c. unbleached or all-purpose flour
2 T. Vital gluten powder (Optional). It really improves the texture and adds protein, if you have some.
BOWL: Add flours mixed with gluten, 1 c. at a time and knead until smooth and elastic (5-10 min., depending on your skill level)
MIXER: Add 2 c. Whole wheat flour, plus the gluten, and mix on high for 3-4 min. Add remaining flour and turn mixer to medium for 7 min.
BREAD MACHINE: Add all flour, with gluten mixed into the flour before it goes in the pan, and set the bread machine for either a medium loaf and color for baking it in the bread machine, or just set it for the dough setting, to then be placed in regular baking pans, or a pottery bread baker, for baking in a regular oven.
**RISING INSTRUCTIONS:
BOWL: Place completed dough back in the mixing bowl, cover, and leave in a warm place until doubled in bulk. Shape loaves and place them in either greased, dark, preferably non -stick, medium-size (8 1/2” x 4 1/2”) bread pans or a greased pottery bread baker. Cover, let rise in a warm place until the dough is almost your desired end height. Do not bake until it is rounded and about 1 1/2 - 2 inches above the sides of the pan. Do not it let rise too high and begin to flatten, because that will result in a fallen loaf with an airy hole in the middle.
MIXER: Using a Kitchen-Aid or Bosch mixer mixes the dough so thoroughly that the dough will not require 2 rising steps. As soon as the dough is smooth and elastic, Shape loaves and place them in either greased, dark, preferably non -stick, medium-size (8 1/2” x 4 1/2”) bread pans or a greased pottery bread baker. Cover, let rise in a warm place until the dough is almost your desired end height. Do not bake until it is rounded and about 1 1/2 - 2 inches above the sides of the pan. Do not let rise too high and begin to flatten, because that will result in a fallen loaf with an airy hole in the middle.
BREAD MACHINE: Remove dough from bread pan when the dough cycle/rising is completed. Shape loaves and place them in either greased, dark, preferably non -stick, medium-size (8 1/2” x 4 1/2”) bread pans or a greased pottery bread baker. Cover, let rise in a warm place until the dough is almost your desired end height. Do not bake until it is rounded and about 1 1/2 - 2 inches above the sides of the pan. Do not it let rise too high and begin to flatten, because that will result in a fallen loaf with an airy hole in the middle.
**BAKING
Bake at 350º for 20-30 minutes, depending on your oven. Turn the pans 180º after 10 minutes. Check for doneness after 20 minutes by holding a pot holder in one hand, and with a potholder in the other hand holding the pan, plop the loaf out onto the free hand to check to see if it is evenly golden brown. If it still looks a bit pale, rotate the pan and continue to bake, checking it every 5 minutes until it is done.
A FEW BREAD BAKING TIPS:
1. If the dough seems too sticky, add additional flour, a little at a time, until it is smooth and elastic, but not too stiff. This includes using a bread machine method. Check the ball of dough several times while it’s mixing. Add flour if it is too sticky, and add a little water if it seems too stiff.
2. One sure way to check for doneness of baked bread when you think it looks finished is to slice right down the center of the loaf, almost to the bottom crust, to see if it is still doughy in the center. If is is, fold it back to together, put it back in the pan, and then bake for another 5 min., or until it’s done. When it is finished, slice those doughy center edges off and the rest of the loaf will be just fine. You won’t have to do this more than once or twice, or until you learn to judge for yourself.
3. I always use an electric knife to slice my bread. By doing this, the slices will be as thin or thick as you want and there will not be a lot of crumbs. Once you try this, you will love it.
4. DO NO USE LARGE, 9 1/2” X 5 1/2” loaf pans!!!! They are too large and most bread recipes will not fill them, making the loaves flat and small. The medium size are the best! Ideally, 8 1/2” x 4 1/2” dark, non-stick bread pans are the best!
BAKER’S SECRET is a good, inexpensive brand that can be found at Kroger affiliated stores or WINCO. Walmart tends to carry only the bigger ones or small mini-loaf pans.